
What are Micro-Greens?
Microgreens are tiny immature vegetable and herb plants grown from seed to the second stage leaves. They are not only one of the most nutritious foods you can eat, they are delicious! Microgreens mimic the flavor of the adult plant. For instance, carrot micro greens taste a lot like carrots, beet microgreens like beets. Micro greens are also one of the easiest crops to successfully grow at home with minimum expense and maximum reward.
When the seeds first germinate, they put out their first set of leaves called the “cotyledon.” The second set of leaves will take on the characteristics of the plant they will become. Its at this point, that harvest usually occurs. Microgreens are often used by chefs for garnishes because of their color, texture and flavor, but as more people become aware of their amazing nutritional value, and astonishing flavors, they are finding their way into recipes of home cooks everywhere and are popular additions to salads, sandwiches, juices, and more.
Why Grow Micro Greens?
Sometimes even when you are looking for them and unless you have a grower you purchase from regularly, they can be hard to find. Plus micro greens have a short shelf life and getting them fresh is best for both flavor and nutrition. They are also somewhat on the expensive side. Many people want to use microgreens for medical reasons, like for juicing and raw diets. Buying the quantities needed for this type use, can definitely dent your budget. This is when growing your own microgreens becomes an easy option.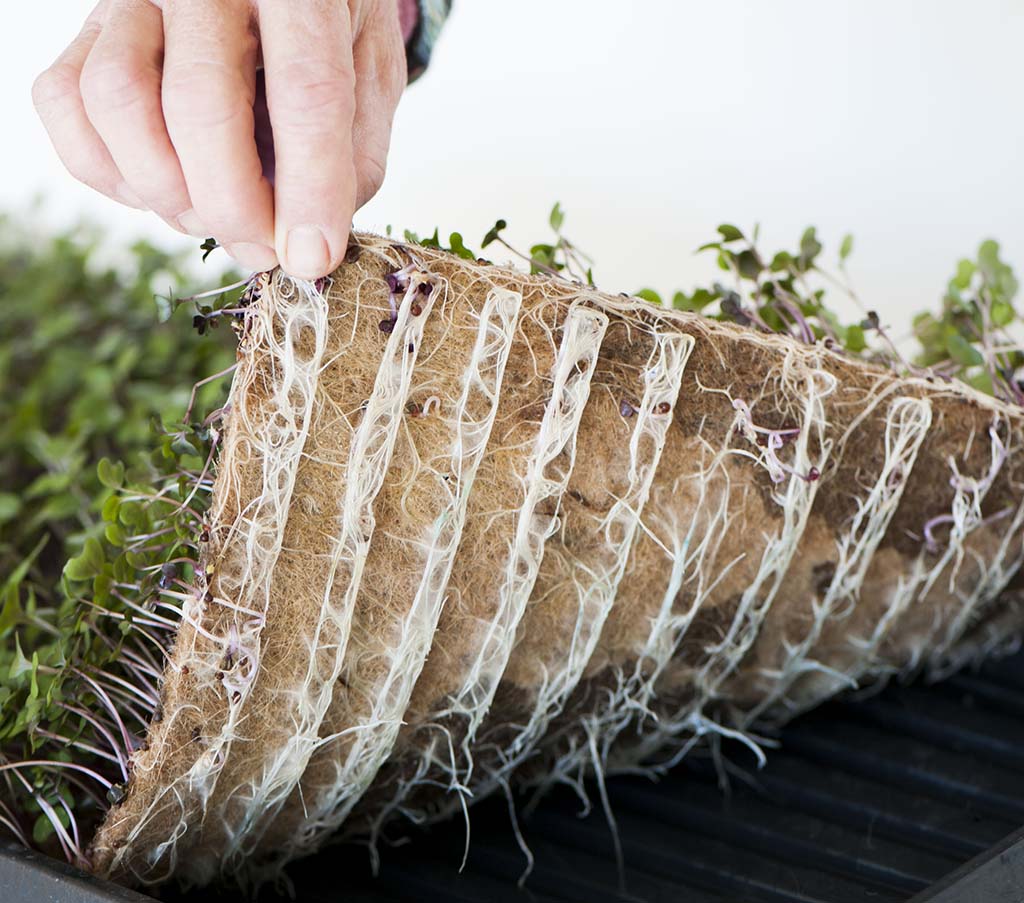
It is also fun and educational to watch microgreens grow. The excessive root development is a pretty amazing thing to watch. You will be witnessing a true miracle of life! It’s got to be one of the easiest crops to grow, too. Even if you’ve had little success growing crops to fruit, it’s pretty hard to mess up growing only to the the second stage leaves!
How to Grow Microgreens The Easy Way
Microgreens are often grown in a “soil like” media. Coir is popular for microgreens as is peat, as are blends of coir or peat with perlite. But for this EASY process, we recommend FibreDust’s new, all natural, newly OMRI listed “GreenEase” Jute Seed Pads. Jute is a fibrous plant and our seed pads are a felt-like non woven 100% jute composition that microgreens LOVE! The best part about growing your microgreens on our jute seed pads is that it’s very clean. When growing microgreens in a soil-like product, the growing media tends to get splashed up onto the plants during watering. Our jute seed pads eliminate this issue and provide a clean base for effective sowing seed, and growing out to harvest. Sold in packs of 10 pads, you’ll have enough to enjoy several crops.
Which Micro Greens Should You Grow?
When deciding what microgreens to grow, FibreDust recommends that if you are inexperienced as a micro-green grower or consumer, you chose some greens that are known to be an easy, fast and great tasting crop. Seeds germinate and grow at different rates depending on the characteristics of the plant. But here is a list of some favorites that we know will please you, not only by taste, but also by success rates.
Fast Growers: Harvest in 10 to 15 days
- Radish Micro Greens are loaded with flavor that taste very similar to the well known and well loved root crop. A blend of “Red Rambo” and “Daikon” radish is colorful and is a spicy treat on salads and great in sandwiches!
- Cabbages, pak choi, collards, kale and mustards are also an excellent and fast growing choice.
Slower Growers: Harvest in 16 to 25 days
- Cilantro: Add this Mexican favorite to dishes like salsa, guacamole or any Mexican dish. Cilantro micros are extremely high in nutrients too. Expect 16 days minimum to harvest.
- Beets: Bulls Blood variety adds color and beet flavor without chopping roots.
- Basil: Intensely flavored and a favorite as a garnish to Italian dishes. It is also packed with nutrients and a great choice for salads as well.
- Arugula: A popular and a high end crop for many growers, Arugula microgreens are wonderful in salads, and on sandwiches.
Forage Micros
There are many folks worldwide who use microgreen growing practices to grow forage for cats, chickens, goats, pigs and more. Wheat grass is popular for this and also popular for those who want to juice it. Wheat grass grows voraciously as a microgreen. Eight days and done!
Preparation and Supplies You’ll need for Micro Greens
Select a good spot for your micros. You want a location that has good light and ventilation. You want the temperature to be comfortable, not too hot or too cold. A heated pad can be used if temperatures will be chilly. Optimum temperature for germination is 75 degrees, for growing; 60 degrees. Humidity is required for germination but not so much after the seedling has started the growing process. You’ll want to remove any dome or cover after the first few days unless the environment is extremely dry. Fans are often used to keep air circulating through the microgreens. This reduces the chance you’ll have mold growing on your micros.
You’ll want two 10×20 nursery trays one with drainage holes and one without. You’ll use the tray with the holes for your sowing and growing tray. The other can be use to bottom water your growing tray and as a cover for the first few days. To water after the initial sprouting phase, you’ll just dip the grow tray into the water in other tray, remove it and let excess water drain. No fertilizers are necessary for most microgreens.
Step One: Sowing

Start by placing a GreenEase seed pad in a 10×20 nursery tray that has drainage holes. (Using a 2 tray system works really well for microgreens. Have on hand one tray with holes and one without.) Sow your microgreen seeds by sprinkling them heavily on top of the pad. Depending on the size of the seed, you need about 10 seeds per square inch minimum. If you are purchasing seeds packaged specifically for Micro Greens, The package should tell you the seed density required. Having the proper seed density is important for proper growth. If seed is sowed too sparsely, the micro greens will have a tendency to fall over. If sowed too densely, you may not have full germination or proper development.
Step 2: Growing

Mist the micro green seeds and the pad thoroughly until the pad and seed is moist. Cover the tray with a damp towel or use your other tray upside down on top of the sowing tray for 2 to 3 days. After 2 to 3 days the cover can be removed. Inside you’ll see your seeds germinating and putting out roots. Once the cover is removed simply keep them moist and in a brightly lit warm area and watch the magic as they start to emerge. If using the two tray method, you can fill your tray without holes with water and just dip the sowing tray into the water and let drain to irrigate. The sowing tray should be moist, but not wet at all times. Always let any excess water drain out of the tray. You can nest the two together in between watering. NOTE.. no fertilizer is required during this process. The seed and mother nature provide all the nutrients your micro-greens will need until you harvest at the true leaf point.
Step 3: Harvest
In as little as 10-18 days, your microgreens will be about 1 to 2 inches tall and ready for harvest! Microgreen harvesting is easiest with scissors. Just cut about halfway up the stem. You’ll be discarding the roots and the pad (it is compostable but not reusable) The nice thing about growing your own micros is that you are able to harvest only what you need and let the rest keep growing until you are ready to use them, or you can harvest the entire tray. Wash before eating or storing. If you plan to store them, they can be refrigerated in plastic bags but, make sure they have been allowed to dry before you add them. Its good practice put a paper towel in with them to absorb any excess moisture from condensation. Moisture inside the bag is a microgreen killer!
The next step is serving and eating your micro greens! We’d love to hear about your success growing microgreens the easy way!
Resources
Purchase the GreenEase Seed Pads here! They come in 2 sizes, 10×20 inch and 10×10.
Many companies specialize in micro-green seeds, here are some of our favorites
- Johnny’s Seeds: Lots of resources and varieties
- Harts Seeds: In business for 125 years, they know seeds!
- Hancock Seeds: Forage Micros
- Sprout House Good site for wheat grass seed
For more information regarding the nutritional value of microgreens, please see the following articles:
- https://agresearchmag.ars.usda.gov/2014/jan/greens
- http://www.healwithfood.org/health-benefits/microgreens-nutrition.php
- http://pubs.acs.org/doi/abs/10.1021/jf300459b
- A resource you may find handy is this guide by Johnny’s Seeds: http://www.johnnyseeds.com/growers-library/vegetables/micro-greens-comparison-chart.html